2015年7月20日 星期一

【Android密技】CPU力不從心?2招設定提升畫面流暢度


如果你的手機不是旗艦機的話,有時候可能會覺得CPU力不從心,滑沒多久就開始頓,我們可以開啟GPU來幫助手機加速,讓畫面不再頓頓的!

1. 進入開發人員選項以後,將「視窗動畫比例」、「轉場動畫比例」、「Animator影片長度比例」三者都從原本的1改為0.5或是關閉,則可以提昇手機的流暢度。
part2-54

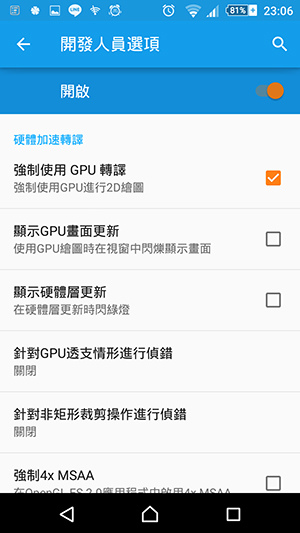
2. 再往下拉一些,找到「強制使用GPU轉譯」並勾選,則可以連2D桌面繪圖時,都使用GPU來加速,因此可以增加滑動的流暢度。
part2-55


 摘自:
http://pcuser.pixnet.net/blog/post/33548810

2014年12月9日 星期二

無法設定預設印表機

Unable to set DEFAULT PRINTER? - Let's troubleshoot

Unable to Set Default Printer pop-up error window:


This error is related to the old printer you have set as default before. Printers name that was recorded in your registry are priority on the system which you cannot modify if you're trying to set a new default printer. So you have to manually modify the registry. Note that the registry section is very sensitive,  serious  problems might occur if you modify the registry incorrectly.  Therefore, make sure that you follow these steps carefully.  For insurance included, move down the registry before you alter it. And that point, you can restore the registry if an issue happens. For Additional data about how to go down and restore the registry, click the accompanying article number to view the article in the Microsoft Knowledge Base:
How to back up and restore the registry in Windows: (http://support.microsoft.com/kb/322756/)

Now, here's how to troubleshoot:

1. Click the Start button and type "regedit", then right click and "run as administrator"


2. Now go to this location:

HKEY_CURRENT_USER\Software\Microsoft\Windows NT\CurrentVersion\Window


3. Located in the right column, you can change the device key v alue data to your printer name. Right click on the Device key then modify the data value (e.g. "HP Laserjet P1006,winspool,Ne03:")


Note: You MIGHT encounter this "Error Editing Value" which you are unable to modify the data,


All you have to do is to set "permissions" to the key, and this is how its done:

Right Click on the "Windows" key and choose "Permissions", check "Allow" -> Apply, then OK.

2014年8月6日 星期三

hao123首頁綁架解除教學

1
QvodPlayer安裝版內建hao123.com首頁綁架、百度工具列...等,如果安裝過程中有小心並取消勾選,是不會被安裝的!


2
如果不小心而被安裝了會怎樣?IE瀏覽器首頁會被www.hao123.com綁架!你的首頁網址會像下列網址:
http://www.hao123.com/?tn=97473572_hao_pg
http://www.hao123.com/?tn=91056825_hao_pg
http://www.hao123.com/?tn=29065018_59_hao_pg


3
就算是解除安裝QvodPlayer也沒用!為什麼沒用?因為移除不乾淨,就算出動像Unlocker這樣的檔案強制移除軟體也沒用,而首頁綁架主要就是透過這些殘留檔案(QvodExtend.dll、QvodExtend_x64.dll)在進行的。


4
如果作業系統是XP,QvodExtend.dll會被鎖住而無法刪除,如果作業系統是Windows 7,QvodExtend_x64.dll會被鎖住而無法刪除(錯誤訊息:無法刪除 QvodExtend: 存取被拒絕。);就算是進安全模式也無法刪除!
※QvodExtend.dll、QvodExtend_x64.dll路徑:
C:\Program Files\QvodPlayer\QvodExtend\5.0.97.0
C:\Program Files (x86)\QvodPlayer\QvodExtend\5.0.97.0


5
其實很簡單!只要將檔案重新命名後再重新開機,就可以將檔案刪除了。


6
將無法刪除的QvodExtend.dll或QvodExtend_x64.dll任意重新命名。


7
將電腦重新開機,刪除「C:\Program Files\QvodPlayer\」資料夾,以及內含的所有檔案。


8
再到「開始功能表」→「控制台」→「新增或移除程式」→移除「百度工具欄」。如果這個IE工具列沒刪除,還是會透過這個工具列來綁架為hao123首頁,當然,下圖圈選中還有其他2個軟體也是QVOD「附贈」的,之後也請一併刪除。


9
卸載」。


10
關閉窗口」。


11
好了!回到IE把首頁設定改掉:「工具」→「網際網路選項」。


12
按「使用空白頁」或「使用預設畫面」或自己設定網址都可以。


13
按「套用」,這樣就手工解除綁架了!重新開啟IE試試吧。


引用 : 阿榮

2014年4月19日 星期六

別人不能用!讓Vista只能用指定的隨身碟

如果我們的電腦中有重要資料,是不是會希望除了自己以外,沒有人能夠將他們複製出來呢?隨身碟如此方便也造成很多資安問題,只要小小一個隨身碟就能複製一 堆資料,所以為了確保安全,最好是在電腦中能對檔案存取設限,其實Vista中暗藏了一些管理功能,你只要先找出隨身諜的裝置識別碼,然後將他們加入 Vista中允許安裝的裝置,最後封鎖那些不在此清單中的裝置,即使別人將隨身碟插入電腦中,也無法安裝,自然就什麼檔案也帶不走囉!

點擊在新視窗中瀏覽此圖片

1.先將隨身碟插入USB插槽後,按下【開始】→【控制台】,然後點擊「裝置管理員」圖示兩次開啟裝置管理員視窗。開啟「裝置管理員」視窗以後,在「可攜式裝置」中可以找到正在使用的隨身碟,在上面按下【內容】。

2.開啟隨身碟內容對話盒以後,切換到〔詳細資料〕活頁標籤,然後點選「值」欄位中的內容,再按下滑鼠右鍵選擇【複製】,然後可以將內容貼上記事本或是抄下來。

※不是每個隨身碟或讀卡機裝置都有硬體識別碼的,因此如果你在這個欄位中什麼也看不到,可以試試【相容識別碼】,還是沒有的話就是不適用在此隨身碟囉。

3. 再回到裝置管理員視窗後,按下「通用序列匯流排控制器」旁的十字,然後在展開後的裝置清單中用左鍵選擇「USB Mass Storage Device」,再按下右鍵從選單中選擇【內容】。一樣在內容對話盒中切換到〔詳細資料〕活頁標籤,然後複製「值」欄位中的硬體識別碼。

4. 接著按下〔Win〕+〔R〕開啟執行對話盒,在欄位中填入「gpedit.msc」以後,按下〔確定〕。開啟「本機群組原則編輯器」後,按下左方窗格中的 「本機電腦原則」→「電腦設定」→「系統管理範本」→「裝置安裝」→「裝置安裝限制」,然後在右方窗格點兩下「允許安裝符合這些裝置識別碼的裝置」開啟。 點選「已啟用」後,在下方欄位會出現一堆字,按下〔顯示〕。

5.跳出「顯示內容」對話盒以後,按下〔新增〕將剛剛我們複製下來的兩個裝置識別碼貼進去。完成以後,按下〔確定〕關閉對話盒。

6.回到本機群組原則編輯器以後,接下來點兩下右窗格最下方的「防止安裝未由其他原則設定描述的裝置」。點選「已啟用」後,除了剛剛我們加入裝置識別碼的設備外,就無法再新增新的裝置了。

2014年4月8日 星期二

語言列消失的解決方法

語言列的執行程式 "C:\Windows\System32\ctfmon.exe"
從工作管理員的處理程序下查看這個程式是否有執行
點選開始功能表,在「開始搜尋」的輸入框中輸入"regedit"並執行
找到 "HKEY_CURRENT_USER\Software\Microsoft\Windows\CurrentVersion\Run"
此行是在開機的時候應該自動執行的程式清單,右邊的欄位應該要有ctfmon字串值,如果消失了代表問題就出在這裡
修正辦法為:在右邊欄位點選右鍵新增字串值"ctfmon",然後再修改這個字串值的數值資料為 "C:\Windows\system32\ctfmon.exe" 完成後關閉。
接下來不管事重新開機、登出再登入,或者直接手動執行 "C:\Windows\system32\ctfmon.exe" 以後開機語言列就會正常出現了。

2014年4月2日 星期三

How to manually uninstall the product using Microsoft Fix it

Issue:

You attempted to uninstall your software on a Windows System using the Control Panel but it appears the uninstall was not completely successful. You may encounter an error attempting to reinstall software if all components of the previous install were not removed.

Causes:

This problem can be due to drive letter changes, removal of the original install image, or other drive changes.

Solution:

The Microsoft Fix It Solution Center can automatically solve uninstall issues and works with Windows 8.1, Windows 8 & Windows 7.

Image of Microsoft Fix It Solution Center logo

  1. Visit Microsoft Support at http://support.microsoft.com/fixit/
  2. Select "Install or upgrade software or hardware" listed in Section 2
  3. Click the "Run Now" button in Section 3 next to "Fix problems that programs cannot be installed or uninstalled."
  4. Click the "Run" button in the install dialog box. Microsoft will download and install the Fix It Engine on your computer.
  5. Select "Detect problems and apply fixes for me" from the Fix It dialog box.
  6. Select the program you wish to uninstall from the list and click the "Next" button.

2013年6月25日 星期二

Windows 8 安裝 Avast! 防毒軟體發生黑屏或無法開啟應用程式的解決方式

我在Windows 8測試安裝防毒軟體的版本是Avast! v8 (v7應該也適用)
安裝後主要的癥狀略舉:
1. 發生黑屏只剩下游標。
2. 按下Ctrl + Alt + Del 會出現登入選項,但無法登入,且畫面跳動不止。
3. 比較好的情況是用虛擬主機測試,可以登入但仍然無法開啟應用程式。

解決方法:
※建議安裝Avast!前先建立Win8系統還原點,當操作錯誤時可以用Win8安裝光碟還原,重新安裝Avast!。

1. Avast! 安裝完成後先不要重啟電腦,必須立即變更設定。
2. 先「開啟Avast! 使用者介面」(在桌面右下方找到Avast!小圖示,指標在上按右鍵即可看到)。
3. 步驟如下
[安全]--->[行為防護]


[設定]


在[主要設定]移除[監控系統中未經授權的修改]的勾號


 在[信任的處理程序]中[新增]2個程序如下:
C:\Windows\explorer.exe  以及  C:\Windows\ImmersiveControlPanel\SystemSettings.exe
最後按[確定]

4. 現在可以放心重新啟動Windows 8 ,上述三種癥狀應可化解。對於喜歡Avast!的朋友應該是個好消息!
 
 轉載自:

Ray的生活分享BLOG